Seriously Easy DIY Halloween Decorations
Halloween is nearly here and it’s time to transform your home with these easy but effective DIY Halloween decorations.
Halloween comes from the ancient Celtic festival of Samhain. Samhain happened at the end of summer, when the Celts believed the barrier between our world and the underworld of ghosts and ghouls got thinner and weaker.
Samhain was a big festival and party meant to scare away the strange powers that came close at this time. When Christianity took over, Samhain was attached to the day before All Saints day, and named All Hallows Eve – and Halloween was born.
Halloween is nearly upon us, and it’s only right we celebrate properly to scare away all those supernatural monsters! These DIY decorations are so effortlessly easy, and work to transform your home into a ghoulish den in a few easy steps.
Our DIY Halloween Decorations Ideas
Bottles of Poison
An easy way to implement an instant level of creepiness into your home is making homemade bottles of poison. These DIY Halloween decorations are so simple, and it might even require (the adults) to drink some wine beforehand. So who can complain!
You just need some empty bottles to decorate. Take your empty bottles and some chalkboard paint, and paint the bottles until they are completely covered and suitably spooky. Either buy your own apothecary labels, or print some off online and stick them onto your creations for a final touch.
If you’d prefer clear glass that look a little ancient and worn, sandpaper the glass down. Once it’s been sanded, use some watered down brown and grey paint mixed and lightly cover the bottle. Once it’s been covered, wait until the paint is nearly dry, and smear the paint off and across the sanded glass. The paint will stick to the rough surface to create a dusty and weathered effect.

Image credit
Eerie Tin Can Luminaries
These DIY Halloween decorations are something that can even be adapted to be used for other seasonal displays, or even for a full time instalment in your home.
You’ll need some empty tin cans for these decorations, some water, scrap paper and a hammer and nail.
Remove any labels from your tin can and clean them, then fill them with water and put them in the freezer. Once the water has frozen, you’ll be able to hammer holes into the tin without it denting and collapsing.
Use your scrap paper to create a template such as a spider, witches hat or even words like BOO! Use the nail and hammer to hammer holes around the template to create the outline on the tin. Leave the ice to melt inside the tin, tip out the water and add a tea light to complete!
For a really spooky look, spray paint the tin black for a ghoulish finish.
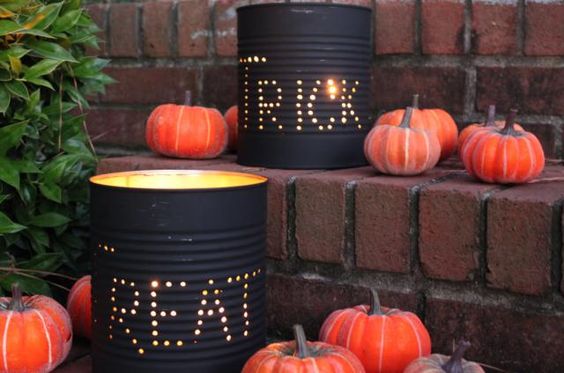
Image credit
Creepy Cup String Lights
These string lights are so simple to create and can create an instant Halloween feel. For these DIY Halloween decorations, you just need some string lights – preferably in an orange colour, plastic cups (these can be coloured too if you can find them) and a permanent marker.
With each cup, use the marker pen to draw faces on them. Get creative! Make pumpkin, ghost, vampire and Frankenstein monsters. Once you’ve done this, use a pen to make a hole on the bottom of the cup. Push a bulb from the string lights through the hole, and secure inside the cup with a small amount of cellotape.
Continue this all the way along until every bulb has a cup attached to it. Now just hang up for a cute but creepy feel for your home.
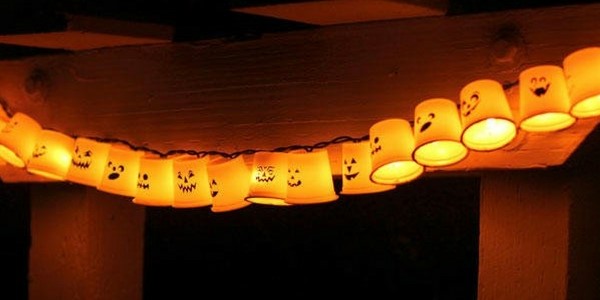
Image credit
Freaky Floating Heads
These decorations are a beautifully simple but terrifyingly creepy decoration that you can hang up in front of your home to scare all those trick or treaters.
If you can find any Styrofoam mannequin heads – these work the best, but if not choose three different shaped Styrofoam balls instead. If you are using the balls, you’ll have to add some creepy features – simple is best for this one so just some black, ghoulish eyes will work.
Use some cheesecloth and cut a square out of it big enough to cover the ghosts, with material draped and dangling at the bottom for that ghostly look. You’ll need to use two layers – so make sure they’re evenly sized.
Place these over the heads, and glue the bottom layer to the face so it’s visible and secured. And just like that, they’re ready to hang!
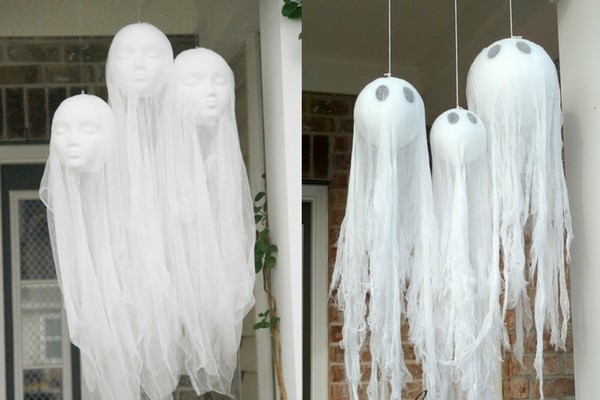
Image credit
Bloodied Candles
If the other DIY Halloween decorations above are still not easy enough and a bit too crafty for you, then this one really is perfect.
It’s a subtle but gory addition to your house or front garden for that Halloween creepiness. All you need is a red candle and some tall white candles. Start burning the red candle, and let the red wax drip onto the top of the white candles and down the sides for the ‘bloodied drips’.
Keep doing this until you get the effect you need and you’re done! Add in some pins or crooked nails to the candle for a real tortured look.
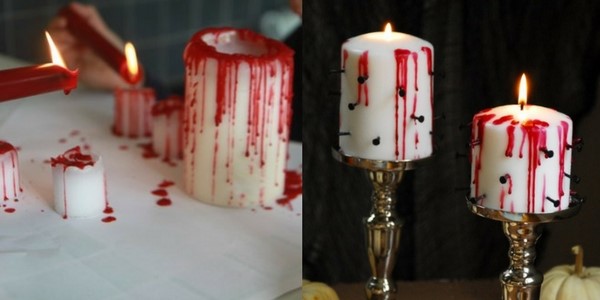
Image credit
Ghoulish Glowing Eyes
These decorations are particularly effective hidden in bushes guiding up to your door on the night of Halloween. All you need are some empty toilet or kitchen roll tubes, some scissors, a pen and some glow sticks.
Take the cardboard tubes and draw eyes on them. Use all sort of different designs – the creepier the better. Once you’ve done this, cut out the eyes – it doesn’t have to be really neat as they’ll be a bit hidden.
Crack the glow sticks, and put a few of the same colour into the tubes until you have the desired brightness. Secure with a bit of cello-tape or blu tack, and they’re ready to be placed in your tree or bushes outside.

Image credit
Scary Supersized Spider
This giant spider is sure to give anybody the creeps this Halloween, and as DIY Halloween decorations go it’s pretty easy to make! And so effective.
All you need is an old, large milk bottle or two Styrofoam balls, black tape and pipe insulation for the legs.
Use the black tape to cover the milk bottle or Styrofoam balls – this’ll make up the body. If you’re using Styrofoam balls, fix a smaller Styrofoam ball on top of a larger one for a head and a body. Cut small triangles in the middle of the tubes or pipe insulation to make them bend at the knee, and tape onto the body for the legs. If you are using tubes, then you’ll need to spray paint the legs black for a real spidery look.
Then finally, add some creepy details like red stripes, eight googly eyes or some feathers to make it hairy and extra realistic.
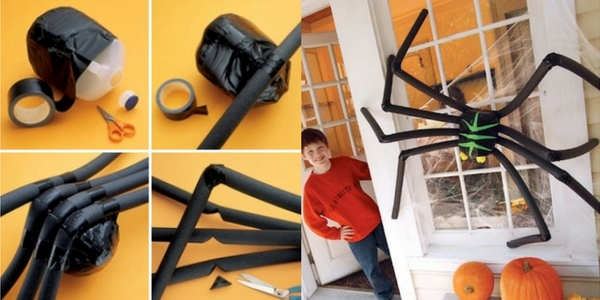
Image credit
Spooky Lamp Silouhettes
These DIY Halloween decorations are seriously easy, and a bit more low-key for your home if you’re not planning an all-American style Halloween takeover.
Simply take some black card and make a template of your choice – you can find outlines online if you’re not great at creating your own! Things like bats, witches, cats work the best, but really anything spooky goes.
Simply make as many as you’d like, tape to the inside of a lampshade in your home and wait for night to fall for these scary silhouettes to take over your home!
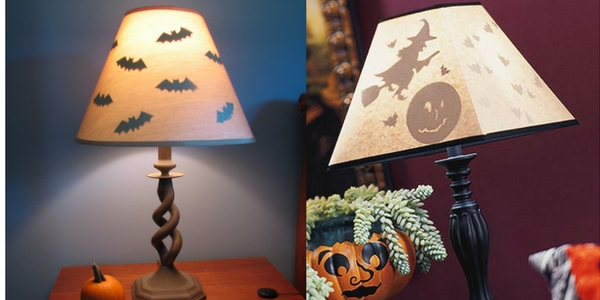
Image credit
Floating Witches Hats
For a wonderfully eerie and mysterious addition to your home this Halloween, try out these wonderfully effective floating witches hats to spook the whole neighbourhood.
For these, you’ll need to go and search for some cheap dress up witches’ hats. You’ll need to decide where you’d like the hats to hang, and add something like command hooks to hang them from – they won’t damage any ceiling or paintwork.
Use a needle to pull some wire or strong cotton through the point of the hat from the exterior to the interior. Don’t pull all the way through. Use the string inside the hat to tie around some battery powered tea lights, glow sticks or any other form of light that won’t weight the hat down.
Now simply tie the top of the string around the hooks for a beautifully witchy display.
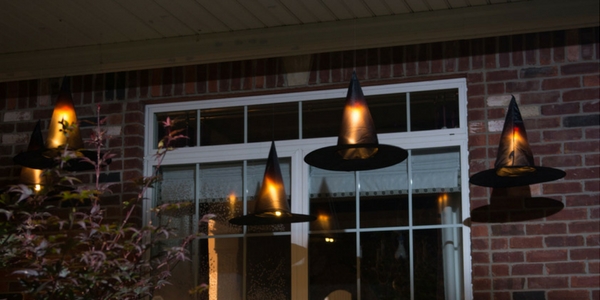
Image credit
Gruesome Bloodied Hand Prints
These bloody handprints are so very effective – they take a little bit more time than some of the other ideas but it’s so worth it. And they can be reused for next year if you store them in a cool dry place!
You’ll need some cling film, PVA glue and food dye. Firstly, you’ll need to place the cling film on a surface and try and ensure it’s tight. It’s easier to wrap it around something like the bottom of a washing up bowl and tape it down so it’s secure.
Apply glue straight to your hand – and quite liberally. Then press your hand onto the cling film for a ‘gluey’ handprint. Apply more glue on top of your handprint template until it’s layered to about 1/8 of an inch thick and let it dry.
Once dry, mix together some more glue with red food dye and a little blue food dye, for a more realistic blood colour. Paint this onto your hand, and press this onto your dried glue hand. Allow this to dry, peel off and then you’re set to go! Use some double sided sticky tape to secure it to windows and mirrors.

Image credit
Disturbing Door Decorations
All you need for these easy DIY Halloween decoration is some cardboard, googly eyes and creativity! Create giant googly eyes by using a paper plate with some black bits of cardboard as the pupils.
Think of using the letterbox as the mouth and adding in some hair and creepy cobwebs or bugs.
Try this mummy door look – all you need is a lot of white crepe paper or even real bandages and tape the edges down on the side of the door. And of course some eyes! We added another two of our favourite designs to give you some more inspiration.
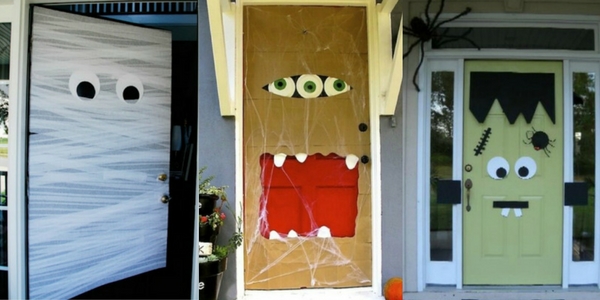
Image credit
Ghastly Ghost Figures
There’s something about this piece that is strangely creepy – especially in the dark Halloween night.
You’ll need a few Styrofoam balls, garden stakes and some cheesecloth or other white, lightweight fabric.
Place a Styrofoam ball on top of the garden rake. Place the fabric over the top so it hangs down and can waft in the wind. Use a small white pin or some glue to secure the cloth to the Styrofoam ball at the top of the ‘head’.
Make several of these and arrange in a circle. To make them look as if they’re dancing, you should tie the corners of the cloth together of the ‘ghosts’ next to each other, so it looks as if they’re holding hands. And it’s as simple as that!
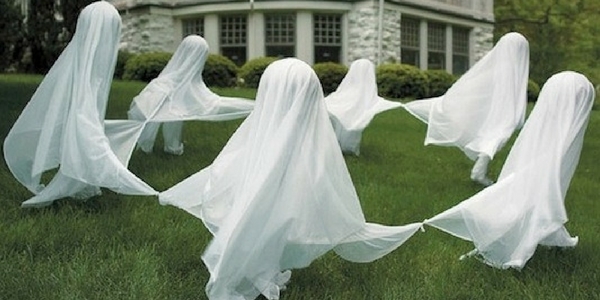
Image credit
Frightening Floating Candles
If you were a fan of the witches’ hats, but want something a bit more crafty that you can make with stuff you’ll have at home – give this easy floating candle DIY Halloween decorations.
Firstly, you’ll need some cardboard tubes – paint them white for that candle look. Use a hot glue gun or some PVA to make thick drips of ‘wax’ from the top of the candle, and dip the drips into the white paint. You’ll need to dip it in, as the glue isn’t as porous as the cardboard, so the paint needs to be thicker.
Make a hole on either side of your painted tube at the top. This will be where you’ll push through some string or fishing wire to balance the electric tea light on. Push the wire through and tie a knot or loop at either side to secure it. Make sure you make the holes about ¾ of an inch from the top, so that the top of the tea light still sticks out but the base is concealed.
Glue a circle piece of paper on the bottom of the tube so the inside of the ‘candle’ is concealed. Then use black string going through the top of the tube to hang from command hooks from the ceiling.
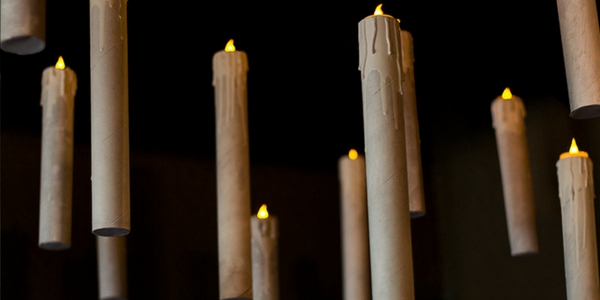
Image credit
Petrifying Punny Tombstones
This simple and punny Halloween decoration is certainly one to make your friends, family and neighbours laugh! For this, you can either make your own tombstone using wood or cardboard or buy a plastic one from any shop around Halloween (the latter option would be the easiest). Okay, so to do this you’ll need a tombstone, black paint and light grey paint, and some scarily good puns.
Firstly, paint the tombstone a light grey colour all over and wait for it to dry. Once you’ve done this, come up with some puns! Using the black paint, paint your name puns onto the tombstones and make sure the paint doesn’t leak (although it would look pretty creepy if it did so that’s down to you!)
Here are some of my favourite examples of tombstone name puns/epitaphs: “RIP Ted N. Buried”, “Here Lies Joyce She’d rather not, But had no choice”, “Yule B. Next, “Real. E. Olde”, “C. Yalater”, “Iyam Deed”.
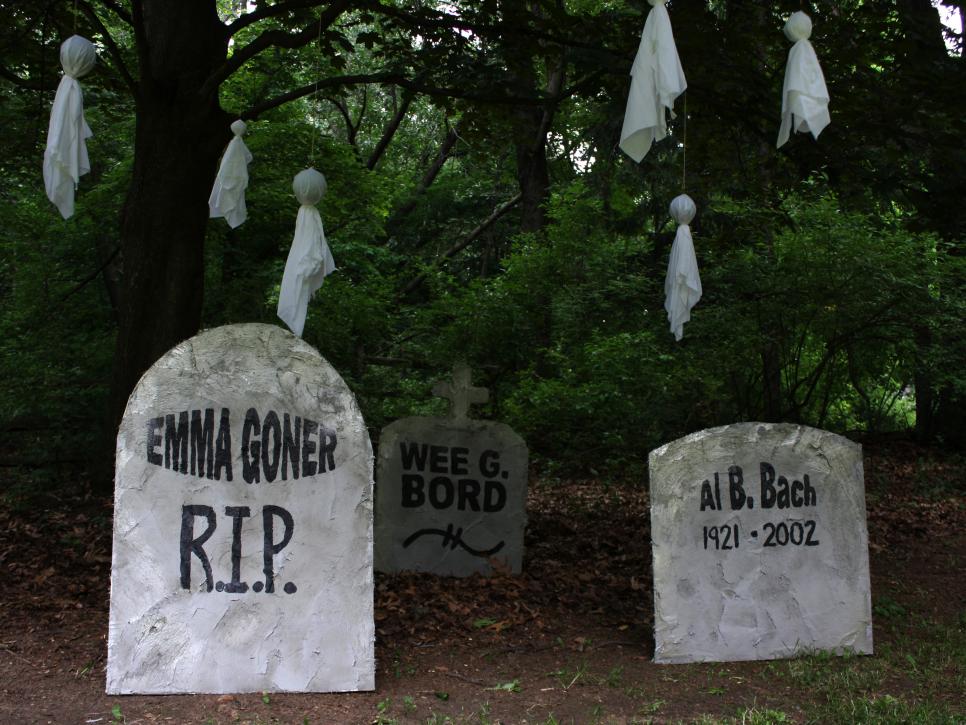
Image credit
Rotting Replica Specimen Jars
To make this one, you’ll need: jars, food colouring, fake animals and water. Before you start, make sure the small fake animals fit in the jar, otherwise, it’s a waste of your money and time! This DIY decoration is really simple, yet super effective! Place the animal you want to make a specimen into a jar, for example, a fake rat. Then, mix up a concoction of water and food colouring – green and orange work best. Don’t forget to make sure that the mixture is still transparent enough to see through! After this is done, pour it into the jar with the fake animal in and you’re done!
To make this even better you could get some sticky labels, write specimen names on them, and teabag them to make them look super old. This would complete an extra creepy decoration!
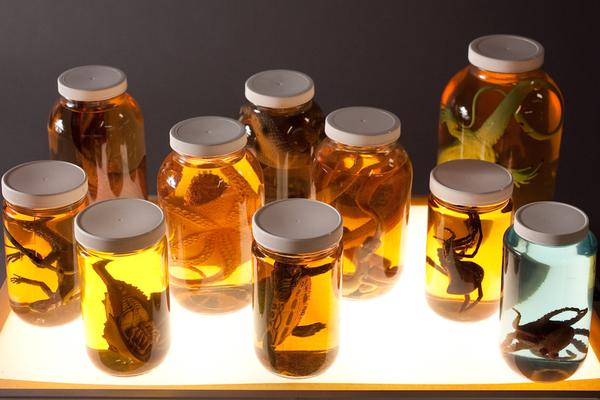
Image credit
Spooky Balloons
This idea is a super simple one. All you need is a permanent marker, white balloons and a snap glow stick. Place the snapped glow stick in the balloon and proceed to blow it up. Once it’s sufficiently blown up, draw a scary face on it. You can stick these to the wall or have them on the floor to kick around. Don’t knock over any furniture!
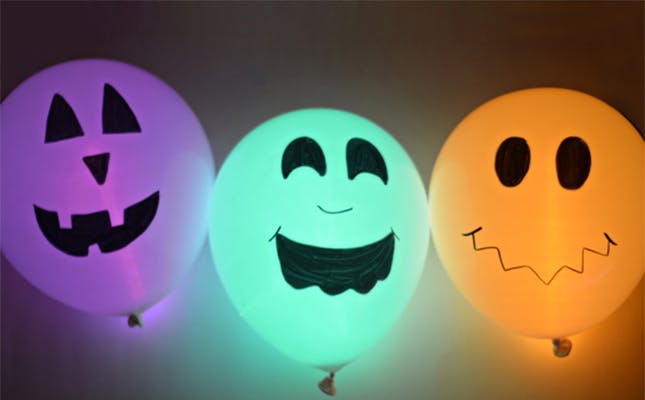
Image credit
Cheesecloth Ghost
For this idea, you’ll need a cheesecloth, a bottle, a styrofoam ball, a marker and some white wire. Remove any labels from your clear plastic bottle and ram the styrofoam ball onto the top of the bottle to make the head. Then, using the wire, sculpt some arms for the ghost and stick the excess wire into the bottle. After this, throw the cheesecloth over the top! Now, it’s down to you to decide whether you want to draw the face on the styrofoam ball or on the cheesecloth that’s over the styrofoam, so it stands out more.
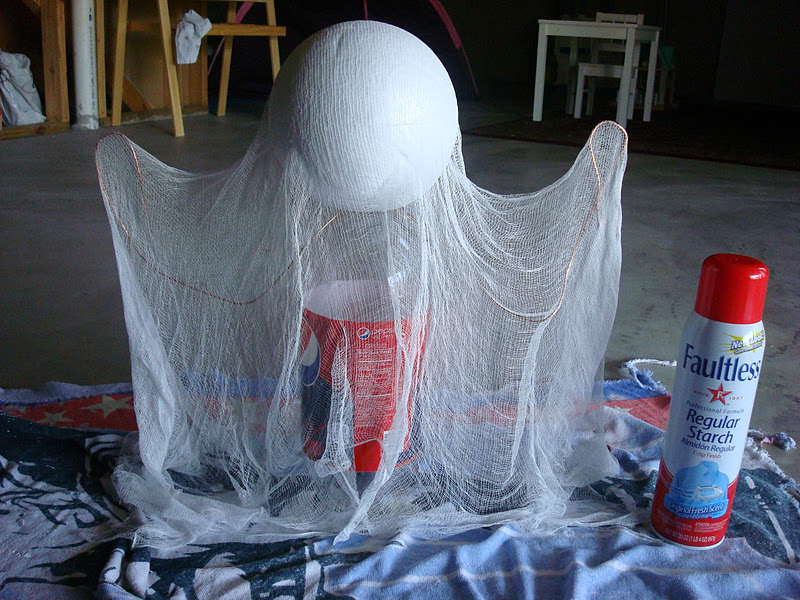
Image credit
Origami Halloween Creatures
It’s time for some spooky, yet adorable, Halloween origami for beginners! Scary monsters, wavy ghosts, talking pumpkins and more! We’re a fan of all things spooky and paper folding, so this collection of easy origami projects is a must for us.
A ghost, pumpkin or even a bat is the perfect origami Halloween decoration for active paper folders to make. You can make a simple paper ghost in just a few minutes, using very basic origami folds. Even children who have never done origami before should be able to make this model with a bit of adult assistance.
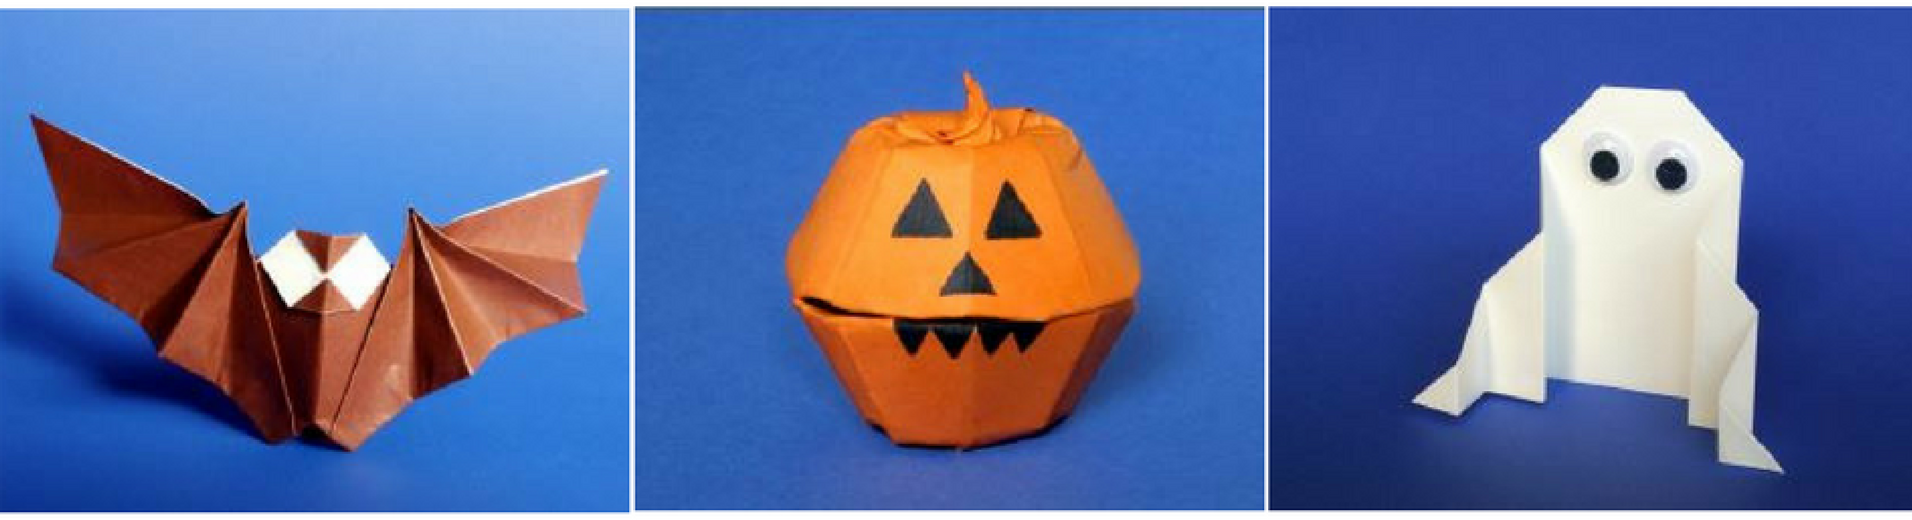
Image credit
To see how these cool origami figurines are made, watch below!
Thoughts
DIY Halloween decorations really don’t have to be as daunting a task as they might seem. These simple ideas can transform your interior into a witches’ cove or vampire’s lair in just a few steps.
Make Halloween the scary part of this October – not the planning and decorating with these easy DIY Halloween decorations!
Are you going to have a go at any of our DIY Halloween decorations? If you are, send us pictures of your spooky interiors on twitter, Instagram or Facebook @therugseller! Happy Halloween!
updated September 2021
Wow there very good